So what do you do when your kids want to be YouTubers? You go figure it out. And in this post, you will have my exact steps on how I helped my kids start streaming their Nintendo Switch gameplay on YouTube. Follow along and soon you’ll be the best Mom, Dad, Uncle, Auntie, Brother, Sister, Grandpa, Grandma EVER! Heck do this for your own self!
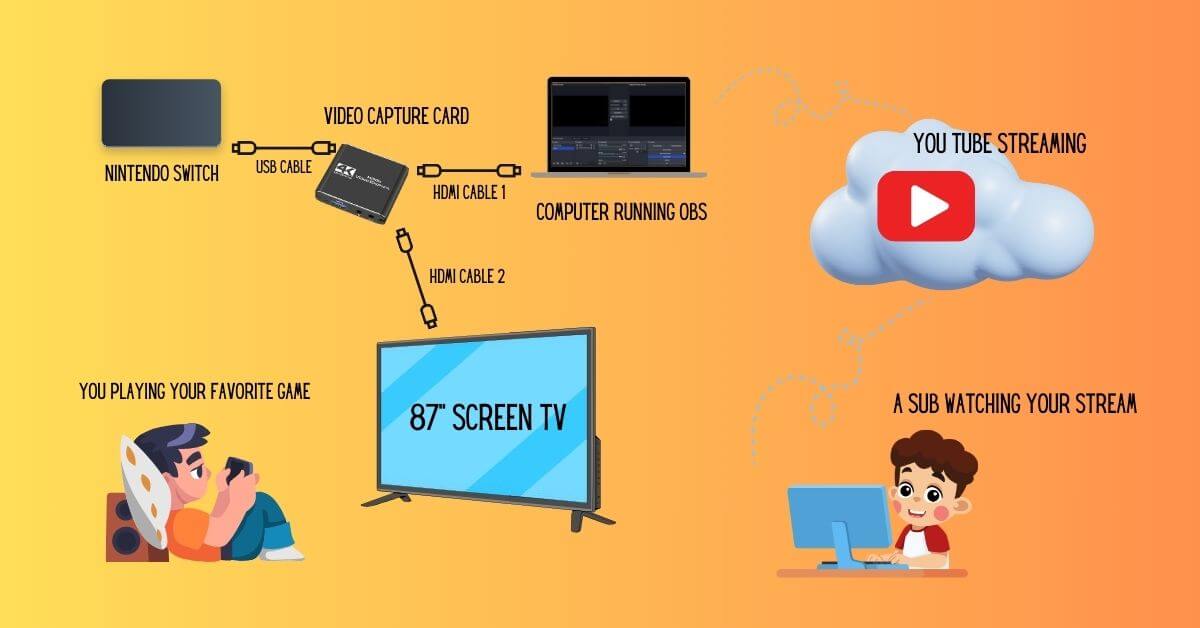
As you can see on the featured image above, it lays out what is needed. I have added links in case you need to purchase them.
Let me reiterate what you need below:
| Nintendo Switch with Dock | View on Amazon |
| High Definition TV with an HDMI Port | |
| Computer w/ USB Port and Internet Connection | |
| HDMI Video Capture Card | View on Amazon |
| HDMI Cable (You need 2 of these) | View on Amazon |
| USB Cable | |
| Open Broadcaster Software (OBS) – It’s Free | Download |
| YouTube Channel – Free to signup |
Download And Install OBS
This software is actually great for screen recording and screen sharing. You can definitely use this for work, however, we are using this today so our kids can become YouTubers.
Go and download and install Open BroadCaster Software (OBS) onto your computer. Pick Windows or macOS and follow the instructions. I’m going to assume you’ve installed software before. So I won’t go into detail here. If you are truly stuck on this, leave a comment below and I’ll get back to you.
Recommended: My Favorite Switch Game Of All Time
Obtain A YouTube Account
If you want to be a YouTuber, you need a YouTube Channel.
- Watch a short video with instructions on How to Create a YouTube channel
- Once your YouTube channel has been created, you need streaming access
- Log onto YouTube
- Click on camera icon w/ + sign in upper righthand corner
- Click Go Live, you will be prompted that YouTube is preparing your streaming access
- It will be 24 hours before you can stream
Now you wait! ⏰
Connect The Bits And Bobs
Let’s set up the hardware!
- Connect the USB Cable from a USB port on your Computer to the USB port on the Video Capture Card
- Connect an HDMI Cable from the Video Capture Card HDMI Output port to an HDMI Port on the TV
- Your TV may have more than one HDMI port. Pick one and ensure the TV input is set for that port.
- Connect another HDMI Cable from the Video Capture Card HDMI Input port to the Nintendo Switch Dock HDMI Port
- Don’t forget to insert your favorite game into your Nintendo Switch.
- Don’t forget to remove your controllers from your Nintendo Switch and place your Nintendo Switch into the Dock
Now, your setup should kinda look like the featured image above.
Configure OBS On Your Computer
Let’s set up the software!
- Open the OBS Software on your Computer
- Create a Scene
- Under Scenes, click the + icon
- Give it a name and click the OK button
- Setup Sources
- Go to Sources, click the + icon
- Click on Video Capture Device, give it a name, check Make source visible and click OK button
- Select USB Video and click OK button
- Go to Sources, click the + icon
- Click on Audio Input Capture, give it a name, check Make source visible and click OK button
- Select a device and click OK button
- Setup Streaming
- Under Controls, click Settings
- Click Stream in the left navigation
- Select YouTube – RTMPS for Service and select Primary YouTube ingest server for Server
- Click Connect Account (recommended) button
- New page will pop up for you to choose your google account, choose account
- Click the Continue button after agreeing for OBS Studio to access Google account
- Close the page
- Click the OK button
We are about almost done!
Go Live
In this section, you are gonna setup your broadcast and GO LIVE. It has been more than 24 hours since you requested streaming access from YouTube. Let’s go!
- Open the OBS Software on your Computer
- Under the Controls area, click the Manage Broadcast button and this will pop up a new window.
- Under the Create New Broadcast tab, fill in the following information:
- Give it a Title and Description
- Set your Privacy to Public
- Set your Category to Gaming
- Select Yes or No for Is this video made for kids?
- Add a thumbnail (1280×720)
- Canva is an awesome tool for creating thumbnails and it’s FREE
- Turn on your Nintendo Switch and TV
- Click the Create broadcast and start streaming button… YOU ARE LIVE!
Congratulations!
Wrap Up
I will create a video in the near future, but for now, these are the steps I needed to start their YouTube careers. ?
I stumbled trying to figure this out but in the end it all worked out. Everything is figuroutable.
The kids can now stream their gameplay to their YouTube channel. And they can now leave daddy alone to do his thing.
I support them and their interests and try to guide them to be the best human beings.
I hope you enjoyed this How-To and hope to see you or your kids showing off their gaming skills.
If you have any questions, comment below and I’ll respond.
Recommended: My Favorite Switch Game Of All Time